Showing posts with label Bench. Show all posts

Tuesday, May 11, 2010

Terrain Tuesday: Imperial Parkway

note:  Apologies to folks that saw updates for all my posts.  I've started using Windows Live Journal to post and I'm still learning.  I think I got the hang of not blowing up the system though.

I have a confession to make:

I love making terrain.  It’s a blast for me to cobble together all sorts of bits and bobs to make a nice City-Fight (I guess it’s called Cities of Death now) piece or a nifty industrial bit.  I like how you start with nothing but craft supplies and end the process with a piece of terrain worth fighting over!

In an effort to reduce the size of my “terrain” bits box before I potentially move, I’ve decided to try and create as much terrain as I can over these summer months.  It’s probably silly as moving with terrain means potentially broken terrain, but my wife might be upset when I pay the movers to carry a box full stuff that to the untrained eye, appears to be trash.  The life of a hobbyist is complicated indeed!

For this Tuesday, I finished a project I started ages ago, an Imperial Parkway.  The idea was simple enough.  Take the leftover foamcore from cutting out the windows to my broken Cathedral and create a fence on a small bit of board.  Sidewalks and eventually a statue.  Nice bit of cover-creating terrain that wasn’t rubble. 
DSCN2903
For the bases of the statues I blatantly stolen the idea from Ricalopia.  In case none of you have been over there, this guy is frakkin’ talented as hell and is a veritable GOLD MINE of ideas that inspire you to produce.  The specific idea I stole was from his Imperial Objectives pieces.  He used the non-bolters detail bits from the Bastions to make pillars.  Simple, effective, genius…stolen! 

I then grabbed 2 brutalized marines from an Ebay auction that I had been too lazy to fix and chopped them up a bit.
DSCN2909This poor marine took a few hits to the noggin.
DSCN2910Ow!  My arm!  Oh!  The humanity!  The humanity!

Carving up the marines was fun.  Drill bits, hobby knife, clippers…teeth.  All were used to desecrate the statues of these marines!  Okay.  Maybe not teeth.
  
DSCN2907 
I made the rookie mistake of poking bullet holes and carving impact cracks into the foamcore before gluing on any details.  I know exactly how it happened too.  I was cleaning up a few edges of the foam and was like, I’ll just put an impact crack here.  Then I grabbed the pin and added bullet holes and before I knew it, I had no space to put on actual bits details.

DSCN2908
I did manage to squeeze in a sword or two on the sides at least.  I cut up a few Dark Angels vehicle symbols.  I mean…I have a million of those flat-winged swords, so why not?

Lastly, I glued down some scouring pad to represent dirt inside each statue area.  I’ll be gluing down some sand over it along with a few clumps of grass to represent the days when these statues were respected.
For painting, I expect it’ll be the same grays I use to paint the rest of my cities.  I’m considering defacing the statues with Chaos script, but then it won’t match anything I’ve done so far.  But so what?  It doesn’t have to match, does it?

Comments are appreciated!  I’ll post an update next Tuesday on the progress.

Wednesday, November 11, 2009

WIP: Crimson Fist Ironclad Dreadnaught


For my Planetstrike game on 11/14, I've decided to field an Ironclad Dreadnaught in a drop pod.  I've been using a regular AoBR dreadnaught proxy in games and I've really liked the Ironclad's performance so far.  Slightly better than a standard dread and well worth the extra points.

I have the Ironclad set from GW, but decided to also kitbash up my own dread.  After trolling various websites for inspiration, I came across an amazing model on Cool Mini or Not by Talarion.  I loved the head piece and the bulky bunker-like look of the model.  So I grabbed my bits and saw and knives and sticky tack and decided to give this conversion a try for my Crimson Fists!

The Dreadnaught shape, of course, is an AoBR model I picked up from The War Store.  I then sawed off most of the front of the model (after much dry fitting and determining best fit and the like).  I haven't glued on the front plate yet as I need to figure out what I want to do with any gaps, but so far, so good.


I used some old LR sponsoon bits (from my LRC) to form the front plate, cutting and fitting as needed.  For the head-lens array, I used a Chaos smoke launcher (at least I think it's a smoke launcher), much like the original inspiration.  Plasticard forms the helmet as well as the armor plate on the model (I don't know why I have black plasticard instead of white...the bag I bought had a large mix of colors and textures).  For the Chainfist, I used an old Epic Titan arm and a plastic tube tacked onto the AoBR arm.


I'm going to detail it up with some pipes and wires and the like.  And the pic makes it clear that I need to smooth out that arm immensely!

For the HK missile, I didn't really like the ones the Ironclad comes with.  It really doesn't makes sense to me that the HKs on Rhinos look so different from the ones on Ironclads, so I just took a normal Rhino HK and cut it down to fit under the dreadnaught.

Lots more to do:
Bulk out the legs with some more armor plates and detail.  Bulk out the body and arms as well...I'm not completely sure about the exhausts on the front...I like it but I don't know if it'll look good painted. And I haven't even touched the back engine!  I also need to assemble the other arm and add in the melta gun/flamer options. 

What do folks think?  Any advice?  I've got a ways to go yet and I may wind up proxying my Ironclad again on 11/14 if this beast isn't done yet.  For fluffy reasons, I'm saying that Pedro Kantor had to reactivate some of the older dreadnaughts after the disaster on Rynn's World…the loss of their armory has left the Fists using whatever they have on hand!

Monday, May 4, 2009

April Challenge: Could have done better!

So it's now May 4th...and I should tally the score for my April Challenge:

I finished the Land Raider Crusader and the Vanguard. I assembled and undercoated everything else on my list. My drop pods still languish in a half-completed state. So that's a grand total of 15 points out of a possible 57. What the hell happened?

I could give a lot of excuses, but the number one reason, I think, is that I had no plan beyond "get some minis" done. I'd sit in front of my painting set up and stare at my vindicator and my razorback and hem and haw over how to paint it. I'd spend way too long fishing out the paints and setting up. Then I wouldn't paint and instead I'd watch movies on Netflix.

Boo on me! I need to make an effort to write down my paint schemes (I just have colors written down) for each model before I start. I also need to establish a method to painting vehicles...I find them very intimidating to even start...since if you mess up, they're pretty much the biggest mistake you'll place on the board. One thing I'm going to try and do is photocopy the unit images in my codices and color them in before I paint. This way I have a paint by the numbers guide. I think my hobbying could benefit from more pictures to work with.

That all set, I'm going to set a May challenge that involves completing the Fists I've started and also completing some Deathwing Terminators for a massive Apocalypse game in July. To encourage me to actually complete this challenge this time, I'm going to start posting my paint schemes and WIP (probably terrible shots as I won't take the time to photobox 'em). That means an update every 3 days in May, starting in 3 days with a shot of a WIP model or a completed one. Expect a more refined painting list in the sidebar.

Lastly, though it was kind of a failure, the April Challenge really provided me with some good lessons on where I could improve (just paint, you fool!) and all the little things I do that stall my hobby progress (like keeping out a million incomplete models in front me...clear the clutter and focus!). Despite the low numbers, I do think I managed to produce more in April than a normal month...now I just need to keep working at getting better!

Monday, April 6, 2009

WIP: CF Sternguard


Sternguard WIP

My April Challenge list calls for 6 sternguard. I own the metal set, but I decided to use one of those guards as a Sgt in a tactical squad so that left me with 4 metal SGs. I didn't want to buy another set so I thought I'd try my hand at creating plastic sternguard marines. Kantor Base asked for ideas on converting plastic tacticals into Sternguard, so I felt inspired to try!

The first guard above is simply made. Weemen has a very simple and elegant tutorial on turning bolters into Sternguard bolters. I was pleasantly surprised at how easy it was. And unhappy that I can't seem to find a single scope in any of my bits boxes! I'll need to grub a pair of them from friends before I can paint them!

For the leg band, I cut some thin plasticard into a strip and dabbed a tiny bit of zap-a-gap on one end. I then wrapped the plastic card all the way around the leg adding tiny drops of zap-a-gap (I used a tooth pick to dip and apply) to hold in place. Once I got all the way around, I cut the card and glued the final end on. I'm going to add white glue rivets following Santa Cruz's tutorial and use a pin to make really small ones.
Sternguard WIP


Sternguard WIP
I notice now I forgot to do some clean up on both these minis. I'll get it done while I wait on those scopes. Suggestions are appreciated! I haven't yet glued these guys.

Friday, April 3, 2009

WIP: CF Command Squad

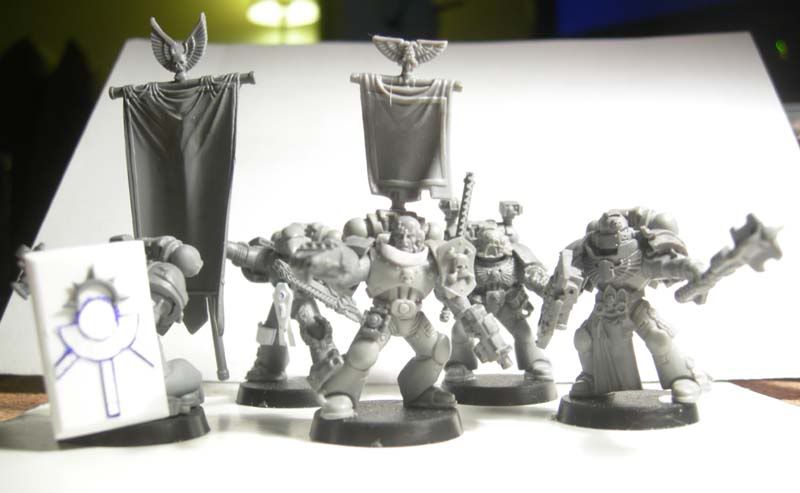
Crimson Fist Command Squad
I've just finished my command squad and I'm fairly happy with the way they turned out. I wanted to practice some simple conversions and since my Crimson Fists are all about getting them on the tabletop as soon as possible, I'm not super concerned with achieving perfection. They're my practice army.*

All my pics should be clickable for the larger versions!
Powerfist Veteran
Veteran with Power Fist
I wanted this Veteran to look capable of leading a squad or fit into a non-jump pack Vanguard unit, so I gave him some bits from various sets. For the neck-armor, I used index card cut to fit and then sealed it with white glue to stiffen it up. I used this method before with my devastator Sgt., and it worked out pretty well.
WIP,Crimson Fists
Completed Devastator Sgt with Neck-Armor

Storm Shield Veteran
Veteran with deluxe storm shield
For my veteran with a storm shield (who can say no to 3+ invulnerable saves?), I wanted to make a massive tower shield. This veteran uses his shield to protect the squad! I made it out of plastic card the I carefully heated to bend around the shaft of a fat pen. Then I detailed it using index card and a bit from a servo-skull. I think I need to add rivets and maybe something a bit more to really complete the shield. Any ideas?

CF Bannerguard
Bannerman with plastic card.
Again, I wanted to practice with plasticard, so I made this bannerman a piece of groin-armor. It's different thicknesses of plasticard. I plan to paint the hanging bits as scrolls. The banner is pinned on so I can paint it separately (and turn it around for pictures!). I need to add some weight to this guy because he tends to tip over with all that weight on the banner.

CF Champion
Company Champion front

CF Champion
Company Champion back
No major conversions on the company champion except I used a Dark Angels power-mace instead of the sword. I like the mace better from the Crimson Fists...for no good reason. I plan to use the blade as a relic blade for the eventual Honor Guard anyway. I clipped the DA symbol and replaced with Terminator armors. I might add some leg-braces or armor, but I'm undecided on whether he needs more detail or not.

I didn't snap a separate shot of my Apothecary since I really didn't do much with him. He's a standard apothecary model out of the plastic box. I might have used the wrong head though as now that I look at my remaining bits, I see the apothecary head right here. I think I grabbed a captain's head. Makes him slightly different I guess!

Any comments or suggestions would be appreciated. I'll probably be painting the squad over the next week or so.

Wednesday, March 25, 2009

On the Bench: Drop Pods

Special Request Edition: GWPertinent asked to see my DIY Drop Pods. I aim to please!

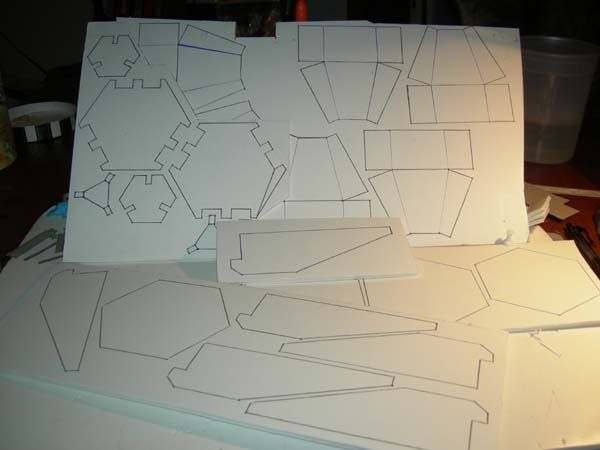
Months (okay, like 2 years) ago, Santa Cruz Warhammer posted a link to a template for making your own Drop Pod. They then made a Dark Angel one and posted the step by step. The drop pod was so awesome, I thought that not only did I need that drop pod in my life...I needed 3 of them. GW didn't offer a plastic drop pod kit at the time (I think it was released the summer of '08?), so I downloaded the templates, printed enough to make 3 pods and got crackin'. For materials, I used foamcore and cereal box cardboard. I *really* cheaped out on these pods cause I was saving money for more Dark Angels!

I used the pin method to transfer the templates to the foamcore, played connect the dots and then spent a ludicrous amount of time cutting and fitting all the pieces. Unfortunately, I don't have a shot of all the cereal box cardboard, but trust me when I say that I eat a LOT of cereal and used a lot of cardboard. Cereal box cardboard is great for detailing buildings and drop pods. Not as good as plastic card, but much cheaper.

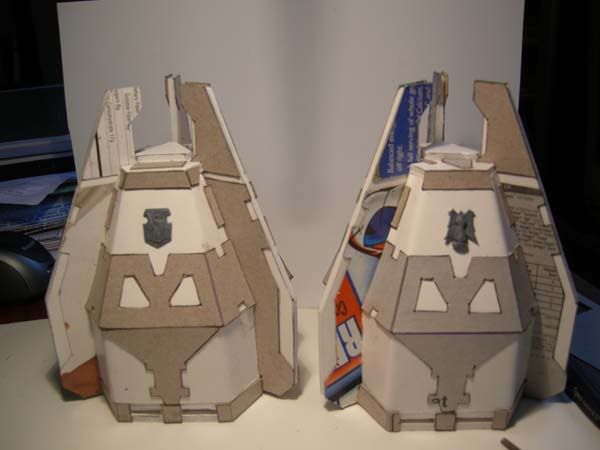
Two nearly-completed pods. They need rivets and engines. If you compare to the Santa Cruz one, you can tell I skimped on some details...I just couldn't bring myself to cut MORE cardboard after having cut enough for 3 pods. Bit off more than I could chew I guess. Ten points to whoever can identify the cereal box I used! I'm in the states, so this may not be fair to those readers across the pond.
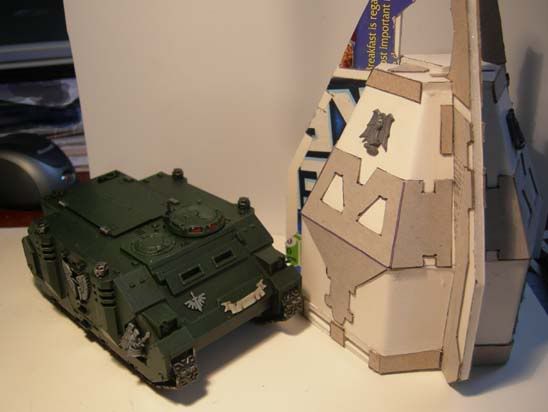
Here is the obligatory Rhino comparison shot. It's hella-big and blocks some serious LOS! They aren't anywhere near perfect and some lines are a little off...but for less than 12 bucks for 3, I really can't complain!

After the release of the Space Marine Codex, I thought I'd give these pods to the Crimson Fists. Dark Angels pay 15 more points a pod and don't even benefit from the Drop Pod assault rule. The one issue: The Dark Angels insignia. I considered ripping them off, but decided against it. Maybe the Crimson Fists won them in a bet from the Dark Angels or something.

I've actually added scratchbuilt engines and started painting them in Crimson Fist colors. I'll try and get a post up soon!

Monday, March 23, 2009

My workbench overflow-eth.

It seems like a standard habit when blogging about the hobby is to update folks with "what's on the bench" so we can all share the pain of having too many minis in progress. I know I have far too many minis in various states of progress.

To begin with, I've been working on my Crimson Fist Land Raider Crusader which will bring my final army list up to 2000 points. Eventually, I'll want to add units of Sternguard, Vanguard, Pedro Kantor and a Vindicator, but I'm in no rush to add to the Crimson Fists since I've just started playing with them (and I'm 2-1 so far). I've also got 3 DIY Drop Pods on the bench awaiting highlights.

I've also been slowly working on my objectives. The shrine is finished and I'm painting the ammunition dump and fuel drums at the same time (since they are so simple). Expect an update before March is up on those 3.

Photobucket
My two HQ units, nowhere near done...but prepped for battle anyway.

I can't decide if I want to go back to working on my Tau...lots of units there could be painted: Both my HQ Shas'Os need painting, 20 Kroot, 3 Pirahnas and 2 Sniper Squads are all based and ready for their colors as well.

Dark Angels,WIP
Deathwing Assault Squad, bases done..models ready for bones colors.
Or maybe I want to return to my beloved Dark Angels...lots of units on the workbench there as well: 10 Deathwing Termies in various states, a basecoated tactical squad, 2 rhino chassis (with magnetized options for predator, whirlwind) with options basecoated. And 6 Ravenwing bikes still all WIP!

For 2009, I think I'm making a hobby resolution: Clear the workbench before buying any Imperial Guard. As much as I've always wanted to field the Guard (and I think I can finally paint them), I think I need to really take a chunk out of all the unassembled, unpainted, unloved minis I have collecting dust in my closet. Who knows...maybe I'll ebay some just to get to the Imperial Guard faster!