Showing posts with label Cities of Death. Show all posts

Tuesday, May 18, 2010

Terrain Tuesday: Tank Traps WIP

I know what you’re thinking. How could he already be moving on to another project? He just started the Imperial Parkway last week!

You, reader, are correct! But let me explain! First of all, I haven't added any flock to the Parkway yet as I haven't had a chance to sit down and do it. Second, I'm playing in a massive Planetstrike game in a couple of weeks (June 5th!) and I've volunteered to make my own defensive terrain for it. Third, I can't help but have multiple terrain projects going.  I think I have AADHD (the extra H is for Hobby!)...I get distracted by inspiration easily! Fourth, it can be used as a Cities of Death Obstacles strategem and I've been meaning to make a few of these to add to my barbed wire options.

Also, I really like alliteration and you can't beat Terrain Tuesday: Tank Traps, right? I mean...that's 4 Ts!
DSCN2985Ahem. Moving on. Here is a very dark shot in the Terrain from Junk style.  These plastic cups are from our local takeout place. Usually filled with tasty sauces and dips, I've cleaned them (can't say this enough...clean the heck out of any food container you decide to use for terrain) and laid them out next to my Librarian (who's hiding in the shadows).

DSCN2987
Very simple work! I cut out the base and laid out the cups with enough space for a single model to pass through, then glued on tops (to cover up the size info) and glued them to the base. The base is slightly bigger than the "6 inches" suggested by Cities of Death strategem, but with my play group, they won't really mind.  It'll look good on a Planetstrike mission as well! Next step is to texture up the cups with some fine sand and then to flock the base with gravel. Knowing how I work, I'll probably flock these Tank Traps (I made 3. I eat a lot of delivery in NYC) at the same time I flock the Imperial Walkway.

DSCN2990
The height and width of the cups look sturdy enough to stop a Rhino or give a Leman Russ reason to go around it. Quite a few of the ones I see for sale seem so tiny compared to the tanks they're supposed to stop! Besides, why buy it when you can make it, eh?

For the game, I'll probably propose that any tracked vehicle with a dozer can move through the Tank Trap with a dangerous terrain test (and destroying the trap), otherwise the terrain is impassable to all non-skimmers. It'll also grant 5+ invulnerable to infantry (and is not difficult for them). Lastly, since this is Planetstrike, the terrain can, of course, be destroyed and replaced with a crater during the Firestorm phase (which I love!).

Show me your custom strategem terrain or defensive terrain if you got it!  I'll link it up and probably steal the design.  I need to make minefields and gun turrets before 6/5...I'm defending a WHFB Fortress in the name of the Crimson Fists that weekend and the more guns, the better.  Defense has it rough!

edit: I have no idea why these photos don't click/link to larger pictures. I uploaded via Windows Live Journal and for some reason only the first pic works.  I'll check when I get a chance and sort it all out. If any one out there has any tips, let me know!

Thursday, April 16, 2009

Reader Request Day 2

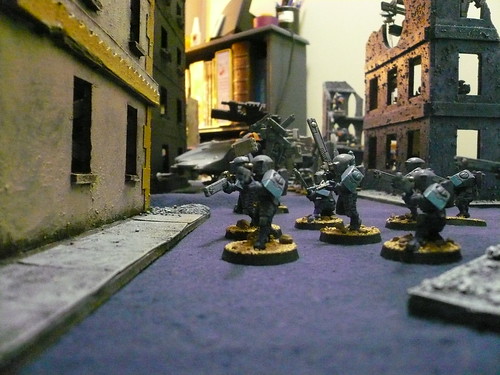
Tau Forces march thru the ruins of an Imperial City

As mentioned in my last post, I had two more large buildings I wanted to show off. Both of these buildings I constructed together as a pair, using foamcore, balsa wood, coffee stirrers and modelling clay to add in all the nifty details.

First up are the WIP shots of a 4 story building, fortified with a few sandbags on the top floor. I offer up the WIP shots so you can see the bits and stuff used. Cardboard for the corner details, wood for the flooring and lots of foamcore!

Up next are the painted versions and some detail shots. I'll admit I'm not the best photographer and taking pictures of terrain is tougher as I can never get the lighting right on the big pieces. If you've got any advice on snapping shots of terrain, I'd be happy to read them!

I learned a lot from my first batch of buildings and applied the lessons to these buildings.
  1. Leave space on the floors for larger based models.
  2. Don't clutter up the bottom floors too much. Less is more for ruined buildings you want to play on!
  3. When painting terrain, drybrushing is your best friend.
WIP shots of my next building: My attempt at a "fortified" building for Cities of Death. I simply boarded up the windows! I guess the sandbags on the previous building might also quality it as fortified...so that's potentially 2 fortified buildings for my table.


And now the painted shots!

Thanks for looking! I hope these pieces inspire you to make your own city terrain! I really found a love of making terrain with this city fight project...and indeed the hobby. There is really nothing like defending your DIY ruined city with your freshly painted marines in 40k. It's why the hobby is one I've stuck with for so long!

Wednesday, April 15, 2009

Reader Request Day 1

In my post "Setting up the Battlefield," Col. Corbane requested some more pictures of my terrain in the comments. As I am a slave to my few readers, I'm always happy to oblige a simple request like this!

All of my pieces are pretty much foamcore, cardboard, glue and bits/rubble. I used MDF boards as the base for all of the pieces. Some of the pieces were made using old GW templates that were available for download...while others were made using my own templates.

First up is my very first building...a ruined Cathedral. When designing it, I thought it'd be neat to construct a building that could be broken up on the battlefield if need be:
My second building was a little more complicated, if a bit smaller. As these were my first terrain pieces, I tried new things with each piece. The cathedral was very simply painted, with only a single color (Shadow Grey) as base and then successive lighter dry-brushed highlights.
I tried a two-color paint scheme and used a little bit of cardboard for detailing. I also laid down some flooring using wooden stirrers for detail and painted the rubble using different colors. For my third structure, I went a little crazy, adding in more detail and way too much rubble. I also made the floors a little too small. Only normal troops can stand on them!

You can probably see that the rubble is a little too dense. Regular troopers fall over on it and forget placing a metal model in that rubble...it'll never keep it's balance! I love this building, but it nearly always gets called "dangerous terrain" in my games.
Here's a work in progress shot:
One more building was made with this "batch" of City Terrain. I wanted to try a different color scheme and settled on a blue/brown scheme. I don't really like it, but I'm really proud of the shape of the building and it looks great on the table...just not the best colors. On this piece, I also added a little bit too much rubble...and the floors are just barely capable of providing enough footing to a large-based unit like a Tau Broadside Suit.

After finishing these buildings, I took a break for a few months to work on finishing up my Tau army (which I never finished). I then decided that I needed 2 more massive buildings and a few smaller rubble piles. I'll post them up next post. I took a few more WIP shots of my 2nd gen buildings, so I'm trying to avoid letting this post get too long. It's also sort of a neat look at how much I've improved in city terrain creation!

Any thoughts, comments, questions or suggestions for new pieces are appreciated! Thanks for looking.